Long Reining
A Short Introduction To Long Reining
Dr. Thomas Ritter © 2013
(article appeared in issue 18 (2014) of BHM)

Why Long Reining?
Long reining is an excellent training technique to support the work under saddle, which is quite beneficial for both the horse and rider, and which can be a lot of fun for both. I have always found that horses generally like this type of work, because on the one hand it is easier for the horse, since he does not have to carry the rider’s weight, and on the other hand it creates a closer bond between human and horse, as they literally work “side by side” and the human has to expend at least as much energy as the horse.
The rider can learn a great deal about the technical, biomechanical aspects of horse training, since he has the entire horse’s body, and especially the legs, in plain sight. By being able to see precisely where each leg is and what it is doing at any given moment, he can acquire the feel for the correct timing of the aids, which will help again under saddle. As he is not sitting on the horse, he can focus on the rein aids, without having to worry about the seat.
Long reining is also a great diagnostic tool, since cause and effect chains play out clearly visible right in front the rider’s eyes. Should a problem arise under saddle, whose cause is not immediately obvious, you can often identify the root cause more quickly and easily at the long rein, since the mechanics of the haunches are directly visible, and you are unable to mask mistakes through weight and leg aids. All mistakes and problems that arise under saddle will therefore show up even more clearly at the long rein.
The horse improves under saddle as a direct result of long reining, as you can explain certain things better at the long rein, while other can be treated more efficiently under saddle. By the same token, the rider improves in the saddle as a direct result of this kind of work, because he can see at the long rein what he is feeling under saddle. Walking behind the horse on the long rein, you gain a visual impression of the back and hindquarters, bend and balance. At the same time you feel the horse’s entire body in your hands. Back in the saddle, you can correlate this visual impression you gained at the long rein with the feel in your seat, legs, and reins. This way, both types of work improve each other, and the rider develops a more complete and more differentiated sense of feel.

Potential Drawbacks
Of course, long reining has its limits and drawbacks as well. For instance, it is difficult to develop a good lateral bend, due to the lack of weight and leg aids. Many horses tend to push their croup up and to go downhill in the canter, which is not easy to correct at the long rein for the same reasons. Long rein horses should therefore be worked regularly under saddle as well. At the Spanish Riding School in Vienna, the long rein horses used to be worked under saddle four days a week and long reined only two days a week.
The biggest danger in long reining is that the horse starts to suck back. To avoid this, it is necessary to let the horse go forward under saddle, at the longe line, or double longe line regularly. Even on the long reins themselves, lengthen the strides at the trot from time to time renews the energy. Alternating between trot and canter also contributes to keeping the horse in front of the driving aids. Horses that have already learned to piaffe in hand can be piaffed with the rider next to the horse’s shoulder for a few strides, in order to restore the activity of the haunches as well as the uphill posture, should they have been lost.
Definition Of Long Reining Versus Double Longeing and Ground Driving
Long reining is traditionally a form of riding, not driving, as is often incorrectly assumed. Therefore, you say, for instance: you ride a turn or a movement on the long rein. It is by nature a collecting type of work, that is practiced predominantly at the collected trot or canter, which is why it is not really suitable for very green horses – unlike ground driving.
Driving horses are ground driven with driving reins. The driver maintains a relatively large distance to the horse, and in contrast to long reining, the young driving horse is worked very much at the walk. The horse is tacked up with a driving harness and driving bridle. The work is generally limited to straight lines and simple turns. On the long rein, however, the rider is close enough to touch the horse, which is bridled with a dressage snaffle. The long rein is shorter than driving reins. The horse learns all the dressage movements, including lateral movements, flying lead changes, pirouettes, piaffe, and passage.
This type of work differs from double longeing as well, where the horse generally wears a longeing surcingle, with the two longe lines running through the rings of the surcingle. When double longeing, the trainer is usually on the centre line, next to the horse, who circles around him. The circle can be moved up and down the long side. The horse is worked mostly at the trot and canter as well. However, the degree of collection is mostly lower than at the long rein. But it is easy to transition smoothly from double longeing to long reining by going behind the horse and shortening the distance. That is why double longeing is a very good preparation and introduction to long reining.

Choosing The Right Horse
Since the majority of the work at the long rein takes place in the collected trot and canter, it should not be started too early. Second Level is a good general marker. Horses who have not yet reached Second Level cannot collect enough yet, for which the rider has to compensate by moving faster to keep up with the working trot and canter. With smaller horses this is often still feasible within certain limits, especially if the rider is tall. But if the horse surpasses a certain height, it becomes increasingly difficult. Not every rider possesses the necessary fitness level, leg length, or stride length. The horse’s ability to collect dictates how much you need to ride forward (under saddle as well as at the long rein) so that he does not get behind the aids, which would create muscle blockages and other problems. If the rider is unable to keep up with the horse’s minimum speed, he will inevitably hold him back with the reins, creating a variety of serious problems within a short amount of time. In cases like that, long reining has to be put on hold, and the horse has to be trained under saddle again for a while.
When choosing a horse for this type of work, a good, honest disposition should always have the highest priority. Avoid individuals that kick easily. The horse should be unshod behind as well, in order to reduce the risk of injury, in case something goes wrong after all.
The long rein horse should not be too tall, either, since the stride length seems to increase exponentially with the height. When the horse is very tall, the rider either has to run very quickly to keep up, or the horse has to be very highly collected. In classical long reining the rider follows the horse at the walk, while the horse is trotting or cantering. This has the advantage that the rider has one foot on the ground at all times through which he can anchor his aids. If he starts running, a suspension phase develops during which it is difficult to bring the half halts through. With young horses and tall horses, or with smaller riders this cannot always be avoided, but it should be the exception rather than the rule.
 Rider Position
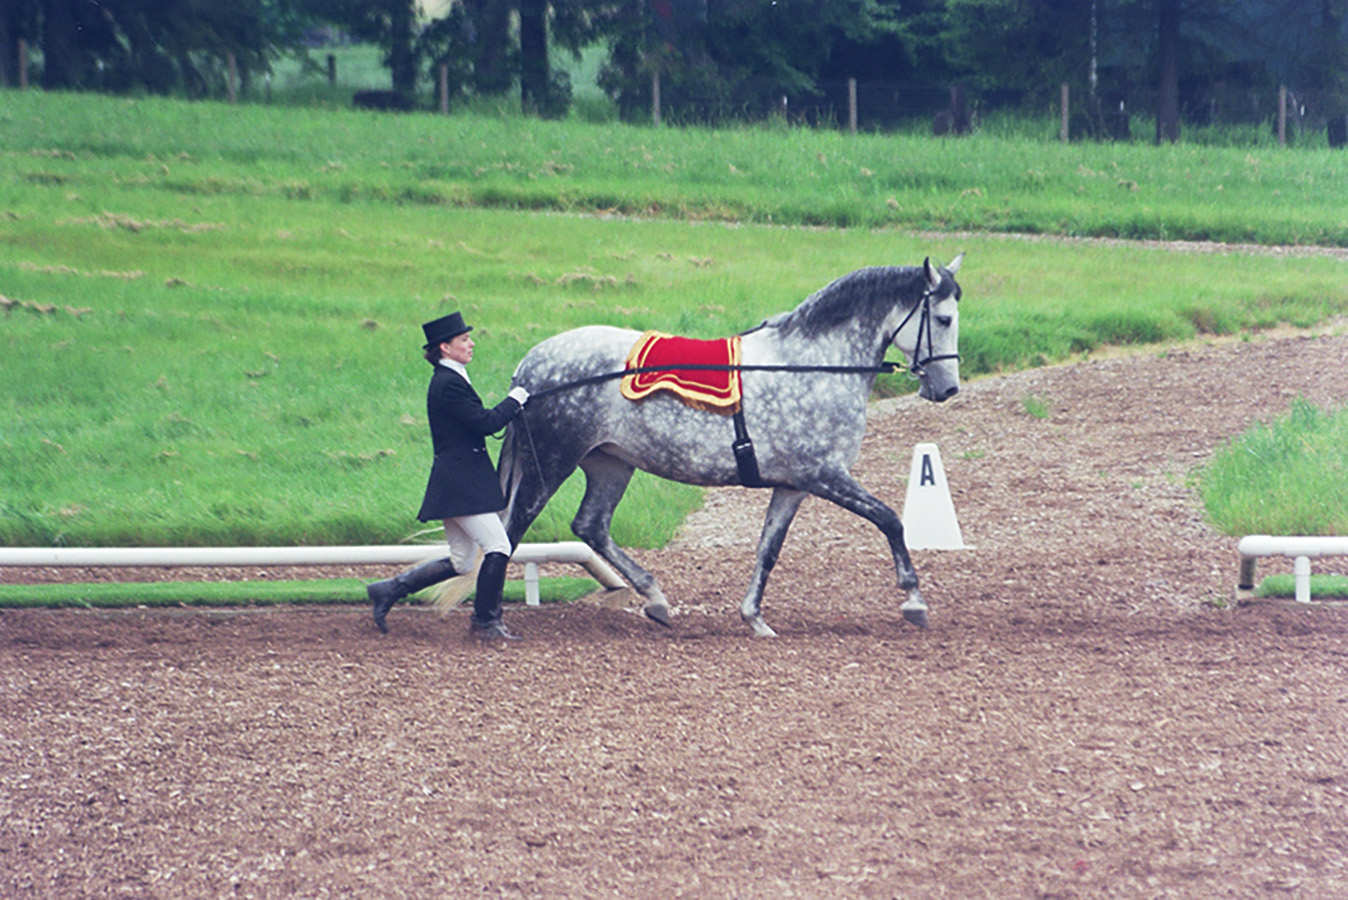
There are several different traditions regarding the rider’s position vis-à-vis the horse. At Egon von Neindorff’s Riding Institute the riders used to walk in the middle behind the horse. In the Spanish Riding School in Vienna, the rider walks next to the inside hind leg at the walk and trot, next to the outside hind leg in the half pass and the canter, in the middle behind the horse during the piaffe, passage, and the tempi changes. I myself walk where I can reach the horse most effectively with my aids. In practice it has proven very effective to walk next to the hind leg of the hollow side, because you can frame it with your body very well, preventing it from escaping sideways. But it is often necessary to change positions, in order to be able to communicate optimally with the horse.
Equipment
As far as the equipment is concerned, the classical tradition uses a regular snaffle, or a full cheek snaffle with a dropped noseband, for the long rein work, a rein of 5-6m (15-18ft) in length, depending on the horse’s size, and a whip. At the very beginning of the training, you can also use a longe line, since it allows you to keep a bigger distance from the horse.
Nowadays you sometimes see curb bits, mostly on horses with fleshy polls, in order to hide contact issues. However, it is more honest and more effective to mobilise the poll and throat latch area through specific gymnastic exercises, so that the horse can go on the bit with a simple snaffle as well.
I personally find longeing surcingles and side reins to be more of a nuisance than helpful. I would also discourage the use of pulleys, because the leverage associated with them can easily create such a powerful traction in the mouth that the horse curls up and goes behind the bit, which is almost impossible to correct at the long rein.
Aids
This type of horse training follows exactly the same principles as the training under saddle, longeing, and work in hand. In other words, there is continuity among various forms of training.
In contrast to the work under saddle, the rider has no weight and leg aids at his disposal in long reining, only the voice, whip and the reins. In addition you can touch the side of the horse’s hip with the back of your hand and forearm, in order to ask for sidestepping; you can push against the hind leg from behind with your hand, in order to drive forward, and it is possible to press down onto the croup from above with your hand or rein during half halts, in order to ask for a deeper flexion of the haunches.
It may come as a surprise to some that you need a seat, even at the long rein, although you are not sitting on the horse. The reason for this is that the aids have to be anchored and coordinated by the core muscles, in order to reach their goal. Therefore, the rider’s posture must not be neglected. A common beginner’s mistake consists of tipping forward while sticking out their “tail feathers” like a duck. This makes it impossible to send the horse from back to front to the rein contact with the core muscles, and the horse falls apart. The rider’s pelvis should therefore be placed vertically below the shoulders, and the back muscles have to be well engaged to create the back to front pressure which brings the horse to the hand.
The whip can either be held vertically up, to touch the croup from above, or vertically down, to touch a hind leg from behind or from the side. Held horizontally, the whip can reach the girth area, where it is able to drive forward or frame the horse laterally. The whip should not be too long, if you are close to the horse. The larger the distance between the horse and rider, the longer the whip can be.

Brief Overview Over The Training
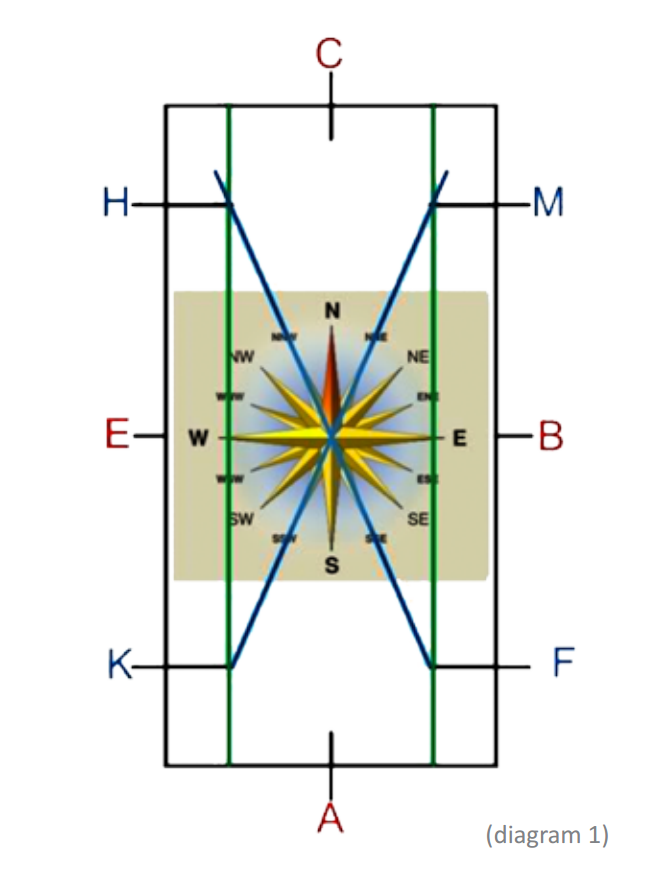
During the early stages of long reining, a lot of time is spent in the walk and trot on the first track around the arena, which is often not easy, especially on the stiffer side, where horses have the tendency to drift over the inside shoulder away from the wall. You practice many transitions between walk, trot, and halt. The corners are ridden by enlarging from the inside aids. This is done most effectively by walking next to the outside hind leg in the corners, and squeezing the horse into the corner with the inside rein and, if necessary, with the whip.
Long reining on the circle enables the rider to straighten the horse and to improve the lateral suppleness of the spine by connecting the inside hind leg with the outside front leg. This can be done, for instance, by walking next to the outside hind leg and pushing the inside hind leg forward-outward towards the outside shoulder. This can easily evolve into a shoulder-in along the long side by going large, running the outside rein across the middle of the croup, and engaging the inside hind leg with the inside rein. The whip can either drive the outside hind leg forward, or ask the inside hind leg to cross.
When working on curved lines, many horses will sooner or later offer the canter out of a misunderstanding. In these cases, it is extremely important that the rider immediately goes forward with the horse to support the canter, so that the horse never gets the impression that the canter is not wanted. Should the rider suppress the canter, or punish the horse for it, it could easily happen that the horse will never learn to canter. In these situations, we have to observe what gave the horse the idea to canter. Then we can try to repeat these aids in order to reproduce the canter depart on purpose.
At the beginning of the long rein training the canter will most likely be rather forward. At this stage, it is mostly important that the horse learns to canter on both leads without breaking to the trot again right away. Over time, the rider collects the canter strides by keeping the horse’s shoulders a little longer at the highest point through half halts. Sometimes, a driving aid is necessary when the hind legs are swinging forward, so that the horse stays in the canter without breaking.
I personally start including the canter as soon as the horse offers it for the first time. Some horses do it as early as the first few training sessions, others do it only after weeks or months of trot work.
If a horse shows talent for the canter, you can include short reprises at the canter, in order to practice the strike off aid. Apart from this, I recommend sticking to the traditional training sequence of corner > volte > shoulder-in > haunches-in > half pass.
The haunches-in is the easiest lateral movement to obtain, but often the most difficult one to „turn off“ again. Many horses throw their haunches to the inside of the arena so enthusiastically that it is easy to lose control of the inside hind leg. So, the rider has to be ready to catch and frame the inside hip with the inside rein during the development of the haunches-in. This is why transitions between shoulder-in and haunches-in are especially useful. This way, neither hind leg can escape laterally.
For the half passes it is usually easiest to turn down the centre line and half pass from the middle of the short side to the middle of the long side, because the turn onto the centre line is initially easier than the turn away from the long side onto the diagonal. Just as in riding, it is crucial for the success of the half pass that you guide the shoulders onto the diagonal line first, and only then ask the haunches to yield. Otherwise, the haunches would be leading, the horse would get crooked, and come off the aids. The inside hind leg has to be brought well underneath the center of gravity from back to front, and the shoulders have to be moved in front of the inside hind leg.
As soon as the simple lateral movements are relatively easy to execute, the counter changes of bend, zigzag half passes, flying changes, and pirouettes can be attempted next. Their discussion would exceed the scope of this article, however.
During the same time that the horse is started in long reins, you can also start to teach the piaffe in hand.
Summary
Long reining is an old, traditional type of work, which lends itself well to the presentation of the trained horse. It is becoming increasingly popular today, because it deepens the rider’s relationship with his horse, and is fun for both. It can enrich the training of both the horse and the rider, and bring variety to the daily routine. Of course, it takes many years to truly master this aspect of training. But it is a very worthwhile pursuit which leads to countless interesting observations.